Water Leaking Into the Connector to My Speakers Back Passenger
Z7_3054ICK0KGTE30AQO5O3KA30N0
hp-concentra-wrapper-portlet
![]() Actions
Actions
HP Desktop PCs - Connecting Speakers or Headphones (Windows 7)
This document pertains to HP and Compaq desktop computers with Windows 7.
This document shows how to connect headphones or speakers to your computer. Use this document to configure the audio settings, determine the correct connection port, and begin using your external audio device on your computer.
Connecting headphones
This section describes the ports and connector plugs needed to use your headphones with your computer.
Connector
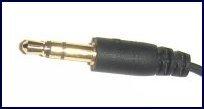
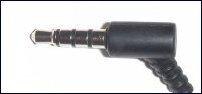
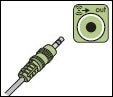
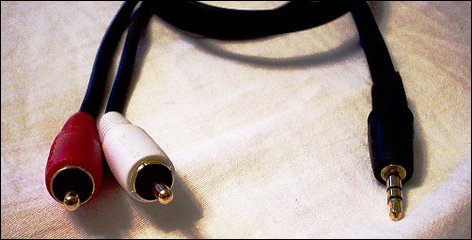
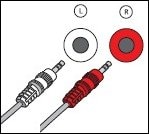
Your headphones have a three-segmented or four-segmented connector plug. Both produce sound when plugged into a headphone connector. The three-segmented plug is for headphones only. The four-segmented plug supports a headphone and an attached microphone.
| | |
Port
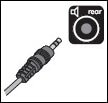
Insert the headphone plug into the port on the computer marked with a diagram of headphones.

Connecting speakers
The following sections describe the ports, plugs, and cables needed to use speakers, and a variety of speaker configurations to use with your desktop computer.
Computer ports for the speakers or headphones
This section gives examples of the various port types found on the back and front of the computer.
Microphone (on some computers, the microphone can also be configured as the Center/Subwoofer out through the Sound Manager software) Line-out (to front powered speakers) Line-in (on some computers, the microphone can also be configured as the rear speaker out through the Sound Manager software)
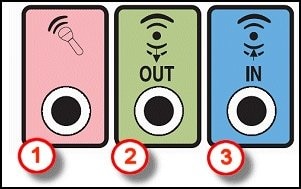
Side speaker out Rear speaker out Center and subwoofer out Microphone Line-out (to front powered speakers) Line-in

Speaker configuration
Choose your speaker configuration to view information about positioning your speakers:
note:Use powered speakers. Do not use older, non-powered speakers with your computer as they are not amplified and do not produce enough volume.
Configuring two desktop computer speakers
Use the following steps to connect a pair of front desktop speakers to the computer:
-
Position one speaker on each side of the computer monitor.
-
Connect the audio cable to the green Speaker Out port on the back of the computer.
-
Plug the speaker AC adapter into the electrical outlet and turn on the speakers.
Configuring stereo speakers built into the monitor
Depending on the monitor, you might need to connect an audio cable, or both an audio cable and an HDMI cable. Check the monitor user guide for more information.
Use the following steps to connect the sound cables to the monitor.
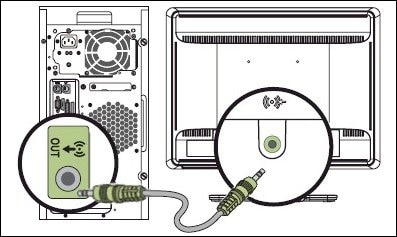
To connect an audio cable (when using a VGA or DVI cable), use the following steps:
note:This section only applies to systems with a VGA or DVI connection, and when an audio plug is available on the back of the monitor.
-
Connect the audio cable to the green audio port on the monitor, and connect the other end to the green audio-out port on the computer.
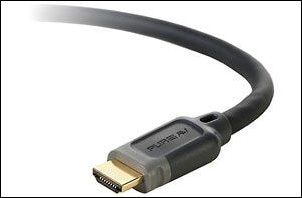
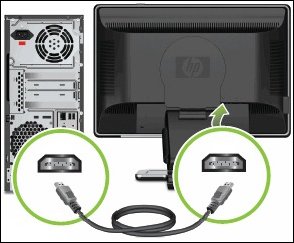
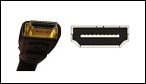
To connect an HDMI cable, use the following steps:
-
Connect the HDMI cable to the HDMI port on the back of the monitor, and connect the other end to the HDMI port on the back of the computer.
For more specific installation and setup instructions, see your monitor setup guide.
-
After connecting the speaker or headphone cable, configure the sound settings using the steps in Setting the default sound device.
Configuring four speakers (front and rear pairs)
Use the following steps to connect four speakers to the computer:
-
Position the speakers. Place the front speakers on each side of the monitor, and the rear speakers behind the listening area.

-
Connect the cable for the front speakers to the green Speaker Out port on the back of the computer.
-
Connect the cable for the rear speakers to the black Speaker Out port on the back of the computer.
-
Insert the power cord from the speakers into the electrical outlet, and then turn on the speakers.
Configuring 5.1 and 7.1 surround sound speaker systems
Use the following steps to connect 5.1 and 7.1 surround speaker systems to the computer:
note:If your speaker system supports SPDIF through a coaxial connection, connect an RCA-style coaxial cable to the orange SPDIF port on the back of the computer and to the main speaker, and refer to SPDIF digital settings.
-
Unpack the speakers and assemble each component following the manufacturer's instructions.
-
Position the speakers, trying to place each of the speakers an equal distance from the center of the listening area.
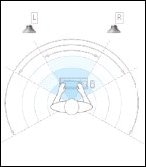
5.1 surround sound speaker placement
7.1 surround sound speaker placement


-
Place the subwoofer on the floor near the computer. Make sure that the connectors on the back of the subwoofer are easily accessible and the speaker faces forward.
-
Place the center speaker on top or in front of the monitor.
-
Place the front left and front right desktop speakers on either side of the monitor.
-
Place the rear left and rear right speakers behind the listening area.
-
For 7.1 surround, place the left side and right side speakers as close to the sides as possible, usually toward the front of the desk.
-
-
Following the directions that came with the speakers, connect the speaker wires between each speaker and the subwoofer, making sure to connect each speaker wire into the matching port.
note:
Use the longer speaker wires for the rear speakers.
-
Place the control tower (the volume control component) near the listening area where it is easily accessible, and plug the cable from the control tower into its matching port on the back of the subwoofer.
note:
If your speaker system supports SPDIF through a coaxial connection, connect an RCA-style coaxial cable to the orange SPDIF port on the back of the computer, and to the main speaker. Refer to SPDIF digital settings.
-
Connect the sound cable with green connectors into the Primary Front Speaker Out port on the back of the computer. Plug the other end of the cable into the green port on the subwoofer.
-
Connect the sound cable with black connectors into the Rear Speaker Out port on the back of the computer. Plug the other end of the cable into the black port on the subwoofer, next to the green port.
-
Connect the sound cable with orange connectors into the orange Center or Digital Out port on the back of the computer. Plug the other end of the cable into the orange port on the subwoofer.

-
Plug the speaker cord into the electrical outlet and turn on the speaker system.
-
Turn on the computer and test for sound.
Configuring speakers connected to a home stereo receiver (digital SPDIF or analog with RCA-style cables)
Depending on your computer and stereo receiver, you can use either an analog (RCA style) or digital (SPDIF or HDMI) connection:
-
An analog connection uses an adapter cable to connect the audio-out ports on the computer to the RCA-style connections on the receiver.
-
A digital connection uses a SPDIF or HDMI cable to connect the computer and receiver.
note:Not all computers come with digital audio capability. You need a Digital Out port or HDMI connection.
To set up an RCA-style analog connection, use the following steps:
-
Purchase the necessary number of Y adapter audio cables as described in the following list.
note:
Make sure that the cables are long enough to reach from the back of the computer to the back of the receiver or amplifier. These adapter cables have one 3.5mm (1/8 inch) stereo miniplug on one end and two RCA-style connections on the other end.
-
If the home stereo system has two speakers, buy one Y adapter cable.
-
If the home stereo system has four speakers, buy two Y adapter cables.
-
If the home stereo system has a 5.1 or greater speaker system, buy three Y adapter cables, plus one more cable for each extra set of speakers beyond the initial 6. For example, buy three cables for a 5.1 system, and four cables for a 7.1 system.
-
-
Turn off the stereo receiver or amplifier, and connect the cables between the receiver and the computer using the following instructions:
-
Front speakers: Connect the stereo miniplug on the Y adapter cable into the Speaker Out (green) port on the back of the computer.
Connect the other ends of the Y adapter cable into the Left In and Right In ports on the back of the stereo receiver or amplifier (usually CD or DVD in).
note:
If your stereo is a 5.1 or higher system, use the front left and right inputs labeled DVD, Surround, 5.1, or 6 Channel.
-
Rear speakers: Connect the stereo miniplug of a Y adapter cable into the Rear Speaker Out (black) on the back of the computer. Connect the other ends of the Y adapter cable into the Rear Left and Right inputs on the back of the stereo receiver or amplifier labeled DVD, Surround, 5.1, or 6 Channel.
-
Center and subwoofer speakers for 5.1 or higher system: Connect the stereo miniplug of a Y adapter cable into the Center or Digital Out (orange) on the back of the computer. Connect the other ends of the Y adapter cable into the Center and Subwoofer inputs on the back of the stereo receiver or amplifier in the section labeled DVD, Surround, 5.1, or 6 Channel.
note:
Plug the Y adapter cable into the Subwoofer port on the back of the receiver or amplifier even if the stereo system does not have a subwoofer.
-
-
Turn on the stereo and select the music source on the front panel. This is the component that the Y adapter cable is plugged into (usually CD, DVD, or 5.1) as the source.
note:
Check the stereo user guide for instructions on setting the music source.
To set up an SPDIF digital connection, use the following steps:
note:You can use a standard RCA-style audio cable for a SPDIF connection.
-
Turn off the stereo receiver or amplifier.
-
Connect the cable into the Digital Out port on the back of the computer.

-
Plug the other end of the cable into the receiver. This is usually labeled SPDIF, COAXIAL, or Digital In port on the receiver.
-
Turn on the stereo and select the music source on the front panel.
note:
Check the stereo user guide for instructions on setting the music source.
To set up an HDMI digital connection, use the following steps:
-
Turn off the stereo receiver or amplifier.
-
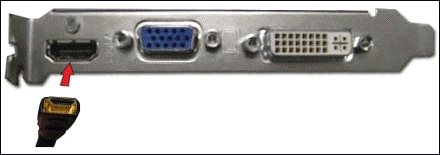
Connect one end of the HDMI cable to the HDMI output on the back of the computer.
note:
The HDMI port is located on the graphics card or the motherboard.
-
Connect the other end of the HDMI cable to the HDMI input on the stereo receiver.
-
Turn on the stereo and select the music source on the front panel.
note:
The video or TV signal/input source needs to match the connector. Check the stereo user guide for instructions on setting the music source.
Setting the default sound device
Windows outputs sound to only one device at a time. You can select which device to use by setting the default device in Sound properties. With Speakers or Headphones selected as the default, Windows automatically switches to the headphones or external speakers when properly connected.
Use the following steps to set the default sound device:
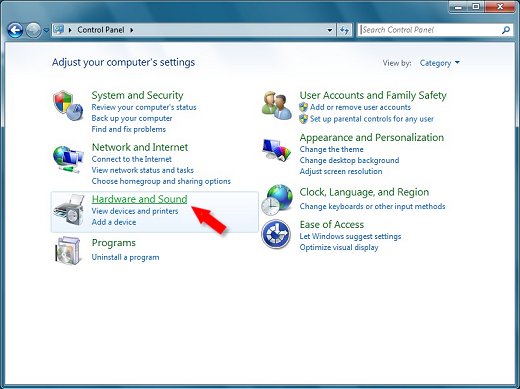
-
Click Start, and then click Control Panel.

-
Click Hardware and Sound.
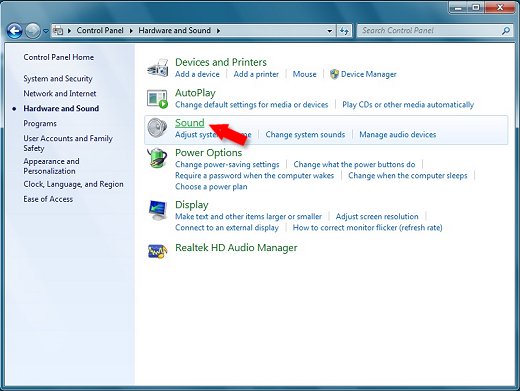
-
Click Sound.
-
In the Playback tab, select the audio device you want to use.

-
Click Set Default, and then click OK.
Making alternate connections
You might want to connect your desktop computer to a television to view photos, watch Internet videos, or surf the Web. This can be done with the correct cables. The computer and the TV must have the same connections. If they do not, you need to use adapters.
You need an adapter cable to connect a home stereo, TV, or recording device to your computer. Cables for VGA, DVI, and component video do not support audio signals. HDMI cables do support audio signals, but not all HDMI-enabled video cards support audio. If your HDTV features an audio input, you might be able to connect a separate audio cable from your computer sound card directly to the TV. If your HDTV does not feature an audio input, you need to connect the audio signal to a different device, such as external computer speakers or your home stereo system.
Water Leaking Into the Connector to My Speakers Back Passenger
Source: https://support.hp.com/rs-en/document/c03923928
0 Response to "Water Leaking Into the Connector to My Speakers Back Passenger"
Postar um comentário